
In the modern digital age, live streaming has become an essential way to interact with an audience in real time. Whether you’re a content creator, business owner, or just someone looking to connect with friends and family, Facebook is one of the most popular platforms for live streaming. For those who prefer a more feature-rich and flexible way to stream, OTSAV (a live streaming software) can be a powerful tool when used in conjunction with Facebook. This article will guide you through the step-by-step process of how to live stream on Facebook using OTSAV on your PC.
What is OTSAV
Before diving into the details of streaming, it’s important to understand what OTSAV is. OTSAV is a professional-grade live streaming software that allows you to broadcast your events, shows, or any content you desire, to popular social media platforms like Facebook, YouTube, and Twitch. Unlike simpler apps or browser-based services, OTSAV offers a wealth of features for video editing, sound mixing, and camera management, which makes it a fantastic option for those looking to enhance their live streaming experience.
Why Use OTSAV for Facebook Live Streaming
OTSAV provides users with a range of advanced features, including real-time video editing, multi-camera support, and graphics overlays, allowing for a more professional and engaging broadcast. It also offers a high level of customization, enabling you to add lower thirds, watermarks, and other enhancements that can give your stream a polished look.
Additionally, OTSAV supports streaming to multiple platforms, which means you can broadcast to Facebook, YouTube, and other services simultaneously without the need for extra setup. Although it has advanced features, OTSAV is designed to be user-friendly, making it easy for both beginners and professionals to use.
System Requirements
Before you start streaming, make sure your PC meets the minimum system requirements for OTSAV. For optimal performance, ensure your system is up to date. You’ll need an operating system like Windows 10 or later, at least an Intel Core i5 processor, 8GB of RAM or more, and a dedicated graphics card (NVIDIA or AMD). A stable internet connection with an upload speed of 3-5 Mbps is also essential for smooth streaming.
Operating System
OTSAV is compatible with Windows 10 and later versions. The software is designed to work optimally on modern operating systems, which is why it’s essential to keep your system up-to-date. Older versions of Windows (such as Windows 7 or 8) may not be fully compatible with newer versions of OTSAV, leading to performance issues or missing features. Additionally, using the latest operating system ensures you benefit from security updates and optimizations that improve system stability and performance.
Processor (CPU)
The CPU (Central Processing Unit) is one of the most critical components for running OTSAV smoothly, as it handles the majority of the processing required for live streaming. To ensure that your stream runs without lag or stuttering, a processor with a minimum of Intel Core i5 or its equivalent (such as an AMD Ryzen 5) is recommended. However, for better performance, especially if you plan to use complex overlays, multiple cameras, or high-definition resolutions, opting for a higher-end CPU like an Intel Core i7 or i9, or an AMD Ryzen 7 or 9, will ensure that OTSAV can handle the processing demands of a high-quality broadcast without issues.
A higher-end processor will also give you the flexibility to stream at higher resolutions (such as 1080p or 4K) with smoother performance, particularly when running additional applications or editing content in real time during the stream.
Memory (RAM)
In addition to the CPU, RAM plays a significant role in determining how well OTSAV runs on your PC. Streaming software requires a decent amount of memory to manage all the data it processes, especially when you add effects, graphics, and handle multiple video inputs. A minimum of 8GB of RAM is recommended for a smooth experience. If you’re planning on running other software simultaneously (such as video editing programs, music software, or browsing), opting for 16GB or more of RAM would be beneficial.
Running multiple high-resolution video feeds or incorporating complex media assets (like animations or heavy graphics) will also demand more RAM. The more RAM your PC has, the less likely you’ll face issues like lag, freezing, or crashing during a live stream.
Graphics Card (GPU)
While OTSAV can work with a standard integrated graphics processor, having a dedicated graphics card (GPU) significantly improves your streaming performance, especially when using video effects, overlays, and high-definition content. A dedicated GPU, such as those from NVIDIA or AMD, will take the load off your CPU, enabling smoother streaming and video processing.
For basic streaming needs, a mid-range GPU such as an NVIDIA GTX 1050 Ti or AMD Radeon RX 560 will suffice. However, if you plan to run multiple high-definition video streams, use advanced video editing tools in real time, or stream in 4K, you should consider investing in a more powerful GPU, such as the NVIDIA RTX 2060/2070 or AMD Radeon RX 5700/5800 series.
A good graphics card will also allow you to use GPU hardware encoding, which significantly reduces the strain on your CPU during the streaming process, improving overall system performance.
Storage
While OTSAV doesn’t require massive amounts of storage, you’ll want to have ample space on your hard drive for saving live stream recordings, backup files, and other media assets (such as video files, images, and audio tracks). The minimum requirement is around 500GB of hard drive space; however, opting for a solid-state drive (SSD) instead of a traditional hard disk drive (HDD) can improve your system’s performance, especially during content editing and file access.
For those who plan on recording high-definition streams (1080p or higher) or saving several streams for later review, having 1TB or more of storage space would be ideal. SSDs are much faster than HDDs, which means quicker file access and a more responsive system, allowing you to seamlessly integrate files during the stream.
Internet Connection
A stable and high-speed internet connection is one of the most crucial factors for successful live streaming. If your internet connection is slow or unreliable, your live stream will suffer from buffering, lag, or poor video quality. For smooth streaming, a minimum upload speed of 3-5 Mbps is recommended for standard 720p or 1080p quality streams. However, if you plan on streaming in higher resolutions, such as 4K, you’ll need much higher speeds — around 15 Mbps or more.
The latency of your connection also plays a role. For the best performance, try to use a wired Ethernet connection instead of Wi-Fi, as wired connections tend to be more stable and have lower latency, reducing the chances of stream disruptions. If you must use Wi-Fi, make sure your signal strength is strong, and the router is within a reasonable distance from your PC to avoid packet loss.
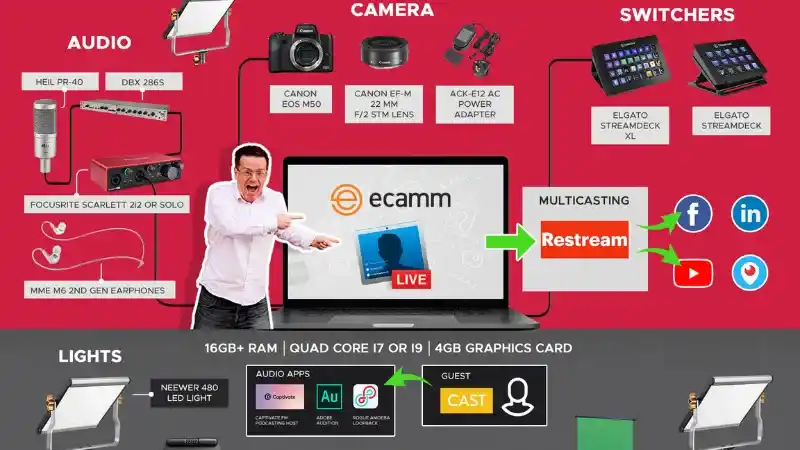
Additional Hardware
For a more professional streaming setup, you may also want to use additional peripherals and hardware. This includes a webcam or external camera for high-quality video capture, a microphone for clear audio, and potentially a capture card if you’re streaming from other devices, like a gaming console.
A stream deck can be helpful if you want to control scenes, camera angles, and graphics quickly during your stream. Having good lighting equipment (such as ring lights or softboxes) will also improve the video quality of your stream, making you appear clearer and more professional on camera.
Software Compatibility
Finally, ensure that your system is compatible with other software you might want to use in conjunction with OTSAV, such as video editors, image editing software, or additional streaming tools. The more streamlined your setup is, the more efficient and seamless your live streaming experience will be.
Step-by-Step Guide to Live Stream on Facebook Using OTSAV
The first step in getting started is to install OTSAV on your PC. Download the software from the official OTSAV website and install it by following the on-screen instructions. Once the installation is complete, launch the software.\
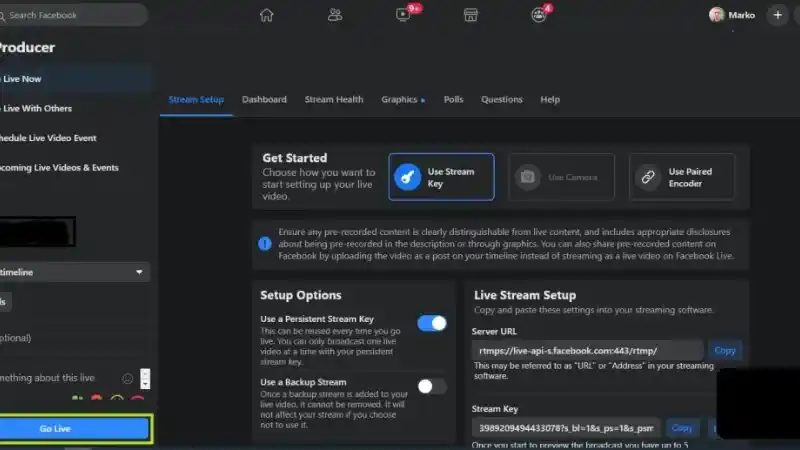
Before you can stream on Facebook, you’ll need to prepare your Facebook account. Log in to Facebook, navigate to the “Live” button in the status update section, or find the “Live Video” option. From there, you will be provided with a Stream Key and Stream URL, which you will need to copy for the next step.
Once you have the stream key, open OTSAV and go to the Settings tab. In the Stream Settings section, select Facebook Live from the Service dropdown menu. Paste the Stream URL and Stream Key from Facebook into their respective fields and click Apply to save the settings.
Next, adjust your video and audio settings to ensure the best quality stream. In the Video Settings, you can select the resolution (typically 720p or 1080p is ideal for Facebook) and frame rate (30fps or 60fps depending on your system’s capabilities). Also, adjust the bitrate (around 2500–4000 kbps for standard quality). For audio, choose the microphone you’ll be using and set an audio bitrate of 96 kbps or 128 kbps, which is typically sufficient for Facebook streams.
Once your video and audio settings are configured, you’re ready to prepare your content. If you’re using a webcam or external camera, connect it to your PC and select it in OTSAV’s Camera Input section. If you’d like to include graphics or overlays, you can add them through OTSAV’s Scene Editor. This is where you can customize your stream with lower thirds, logos, background music, and other elements that enhance the viewer’s experience.
With everything set up, it’s time to go live. Go back to the main screen of OTSAV and click the “Go Live” button. OTSAV will begin streaming to Facebook using the stream key and URL you entered. During the broadcast, you can monitor the stream directly through OTSAV’s interface, and if necessary, make adjustments as you go. Additionally, you can interact with your viewers by reading comments and responding through the chat feature in OTSAV.
When the broadcast is over, click the “Stop Streaming” button in OTSAV to end the stream. Facebook will automatically archive your live stream for later viewing, and you will have the option to edit and share it further.
Troubleshooting Tips
If your stream is lagging or buffering, the issue may lie with your internet connection. Make sure your upload speed is sufficient and adjust the bitrate accordingly. If you experience audio or video sync issues, you can adjust the audio delay settings within OTSAV. In case the stream key isn’t working, verify that the key you entered matches the one provided by Facebook, as stream keys are often case-sensitive.
Live streaming on Facebook using OTSAV on a PC can greatly enhance the quality of your broadcasts by offering a range of powerful customization and professional features. By following the steps outlined above, you can set up a smooth and engaging live stream, whether you’re streaming for entertainment, business, or educational purposes. OTSAV gives you the flexibility and control needed to produce high-quality broadcasts, making it an excellent choice for anyone looking to improve their live streaming experience.